
Nota Rujukan AI - Klik untuk Buka
Nota Rujukan AI lanjutan atas Talian :
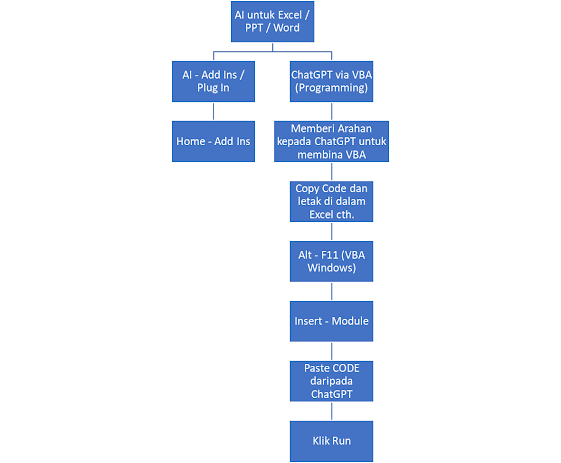
Cara menggunakan CHATGPT membina VBA code untuk Microsoft Office
What is ClipChamp (AI video creation site)?
--------------------------------------------------------------------------------------------------------------------
Semua pautan di bawah adalah laman web berasaskan AI,
Untuk Menyunting / Edit Gambar - Membuang Background
Untuk meningkatkan kualiti Gambar
https://www.pixelcut.ai/image-upscaler
https://picwish.com/unblur-image-portrait
Visual Basic for Applications (VBA) adalah alat yang sangat berguna untuk mengotomasi tugas di dalam aplikasi Microsoft Office, termasuk Microsoft PowerPoint. Dengan bantuan ChatGPT, Anda boleh dengan mudah membuat code VBA tanpa perlu menjadi programmer. Berikut adalah langkah-langkah yang Anda boleh ikuti untuk membuat code VBA untuk Microsoft PowerPoint menggunakan ChatGPT.
1. Memahami Konsep VBA code Anda
Langkah pertama adalah memahami tugas yang ingin Anda otomasi dalam PowerPoint. Misalnya, apakah Anda ingin membuat presentasi baru, mengubah format slide, atau menambahkan animasi secara otomatis? Semakin terperinci anda mengarah CHATGPT membuat code, semakin tepat pula code VBA yang dapat dihasilkan.
2. Menyusun Pertanyaan yang Jelas
Setelah Anda tahu apa yang Anda inginkan, Anda harus merumuskan pertanyaan atau permintaan yang jelas ke ChatGPT. Misalnya:
- "Bagaimana cara membuat kode VBA untuk menambahkan 10 slide baru di PowerPoint dengan judul yang berbeza?"
- "Tolong buatkan kode VBA untuk menambahkan animasi fade-in ke semua objek di setiap slide."
3. Menggunakan ChatGPT untuk Menghasilkan Code VBA
Ketika Anda sudah siap dengan pertanyaan Anda, masukkan ke dalam ChatGPT. Contohnya:
Permintaan: "Bagaimana cara menambahkan teks ke slide pertama di PowerPoint menggunakan VBA?"
Respon ChatGPT: Berikut adalah contoh code VBA untuk menambahkan teks ke slide pertama di PowerPoint:
vbaSub AddTextToSlide1() Dim slide As slide Dim textBox As Shape ' Mengambil slide pertama Set slide = ActivePresentation.Slides(1) ' Menambahkan kotak teks ke slide Set textBox = slide.Shapes.AddTextbox(msoTextOrientationHorizontal, 100, 100, 500, 50) ' Menambahkan teks ke dalam kotak teks textBox.TextFrame.TextRange.Text = "Ini adalah teks yang ditambahkan oleh VBA" End Sub
4. Memahami Code yang Dihasilkan
Penting untuk memahami code yang dihasilkan agar Anda dapat melakukan modifikasi jika diperlukan. Dalam contoh di atas, code tersebut menambahkan kotak teks ke slide pertama dan memasukkan teks "Ini adalah teks yang ditambahkan oleh VBA". Anda dapat mengubah posisi, ukuran, atau teks sesuai kepada keinginan Anda.
5. Menguji Code di PowerPoint
Setelah kode dihasilkan, buka PowerPoint dan ikuti langkah-langkah berikut untuk menjalankan Code:
- Buka PowerPoint dan tekan
Alt + F11untuk membuka Editor VBA. - Pilih
Insert > Moduleuntuk menambahkan modul baru. - Salin dan tampal code yang dihasilkan oleh ChatGPT ke dalam modul tersebut.
- Tutup Editor VBA dan kembali ke PowerPoint.
- Untuk menjalankan code, tekan
Alt + F8, pilih makro yang baru saja Anda buat, lalu klikRun.
6. Melakukan Penyesuaian
Jika code yang dihasilkan belum sepenuhnya sesuai dengan keinginan Anda, Anda perlu melakukan penyesuaian secara manual atau kembali ke ChatGPT untuk meminta modifikasi atau klarifikasi lebih lanjut.
7. Memanfaatkan ChatGPT untuk Otomasi Lebih Lanjut
Anda dapat menggunakan ChatGPT untuk membuat berbagai macam skrip VBA lain, seperti:
- Menambahkan animasi secara otomatis ke slide tertentu.
- Menyusun ulang urutan slide.
- Mengimport data dari Excel ke dalam slide PowerPoint.
Dengan ChatGPT, proses penghasilan code VBA menjadi lebih mudah dan cepat. Ini memungkinkan Anda untuk lebih fokus pada aspek kreatif dari presentasi Anda, sementara tugas-tugas yang berulang dapat diotomatisasi dengan code VBA yang dihasilkan.
--------------------------------------------------------------------------------------
AI untuk Microsoft Excel menggunakan ChatGPT
ChatGPT memang membantu mempercepatkan dan memudahkan kerja di dalam Microsoft Excel menggunakan fungsi di panggil VBA code, yang boleh diguna-pakai banyak kali tetapi dengan pembinaan code VBA sekali sahaja.


------------------------------------------------------------------------------
What is Clipchamp?
Clipchamp is an online video editor that offers a range of tools for video creation and editing. It's designed to be accessible for beginners while providing enough features for more experienced users. Clipchamp is particularly well-suited for creating social media content, presentations, and marketing videos.
Getting Started with Clipchamp
1. Sign Up and Log In
- Create an Account: To start using Clipchamp, visit clipchamp.com and sign up for a free account. You can also log in with an existing account.
- Choose a Plan: Clipchamp offers both free and paid plans. The free plan provides basic editing tools and access to limited stock footage, while paid plans offer more features, higher export resolutions, and a larger library of stock assets.
2. Create a New Project
- Start a New Project: Once logged in, click on the “Create a video” button on the dashboard. You can choose from different aspect ratios depending on the platform you're creating content for, such as 16:9 for YouTube or 9:16 for Instagram stories.
- Set Up Your Project: Name your project and set the desired resolution. Clipchamp supports resolutions up to 1080p (Full HD) on the free plan and up to 4K on paid plans.
Importing Media
3. Upload Your Media Files
- Import Media: Click on the “Add media” button to upload video clips, images, or audio files from your computer. You can also import media directly from cloud storage services like Google Drive, Dropbox, or OneDrive.
- Explore Stock Footage: Clipchamp offers a library of stock footage, music, and sound effects. Some assets are free, while others require a paid subscription.
Editing Your Video
4. Add Media to the Timeline
- Drag and Drop: Drag your uploaded media files from the library onto the timeline at the bottom of the screen. Arrange the clips in the order you want them to appear in your video.
- Trim and Split: To trim a clip, click on it in the timeline, then drag the edges to shorten or lengthen it. To split a clip, position the playhead where you want to cut, and click the “Split” button.
5. Add Transitions and Effects
- Transitions: To smooth out the transitions between clips, click on the “Transitions” tab. Drag and drop a transition effect between two clips in the timeline.
- Filters and Effects: Apply filters, color correction, and other effects by selecting a clip and choosing from the options in the “Filters” tab.
6. Insert Text and Titles
- Add Text: Click on the “Text” tab to add titles, captions, or end credits to your video. Drag a text style onto the timeline, and customize it by changing the font, size, color, and position.
- Text Animations: Make your text more dynamic by applying animations. Clipchamp offers various text animations that can make your video more engaging.
7. Add Music and Voiceovers
- Background Music: To add background music, drag a music file from the media library onto the audio track in the timeline. Adjust the volume and trim the track as needed.
- Voiceovers: Record a voiceover directly within Clipchamp by clicking the “Record” button. You can also upload pre-recorded voiceovers and sync them with your video.
Advanced Editing Features
8. Use Green Screen Effects
- Green Screen: If you have clips with a green screen background, you can remove the green and replace it with another video or image. Select the green screen clip in the timeline, and use the “Chroma Key” tool to key out the green color.
9. Picture-in-Picture (PIP)
- PIP Effect: Overlay one video clip over another to create a picture-in-picture effect. This is useful for reactions, tutorials, or presentations. Drag the second video onto a higher timeline layer and resize or reposition it.
Exporting Your Video
10. Preview and Final Adjustments
- Preview Your Video: Before exporting, play through your entire video to ensure everything looks and sounds perfect. Make any necessary adjustments.
- Export Settings: When you're satisfied with your video, click on the “Export” button. Choose the resolution and quality settings. Note that higher resolutions require a paid plan.
11. Export and Share
- Export Your Video: Click “Export” to render and save your video. Clipchamp will process your video, which may take some time depending on its length and complexity.
- Sharing Options: Once the video is exported, you can download it to your computer or share it directly to platforms like YouTube, Google Drive, or social media.
Tips for Effective Video Editing in Clipchamp
- Keep It Simple: Don’t overcomplicate your video with too many effects or transitions. Keep your edits clean and focused on the content.
- Use Stock Footage Wisely: Incorporate stock footage and music to enhance your video, but make sure they fit the theme and tone of your content.
- Consistent Style: Maintain a consistent style throughout your video by using the same fonts, colors, and transitions.
- Regularly Save: Clipchamp automatically saves your work, but it’s a good idea to manually save your project frequently, especially after making significant changes.


